Star Wars and Jell-O? Odd combination, right? Just the other day I thought the same thing too until I saw a set of Star War Jell-O molds at my local grocery store. It took me a few moments to figure out if I indeed really need this product and the answer was obviously yes!
Before I started making the Jell-O, some tuneage was required. I queued up my Spotify app to the Star Wars Episode V: The Empire Strikes Back soundtrack.
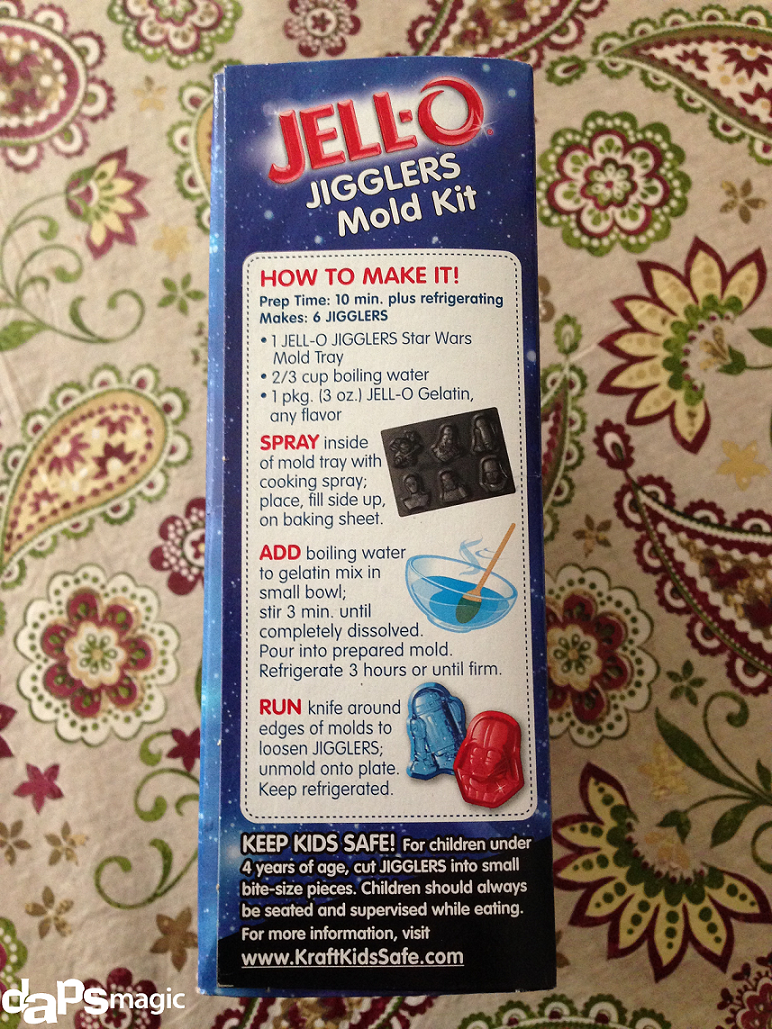
To begin, make sure that you have all your needed items out. In this case that includes a few mixing bowls (depending on how many flavors used), a measuring cup, hot water, cooking spray, Jell-O mix, your molds and of course patience.
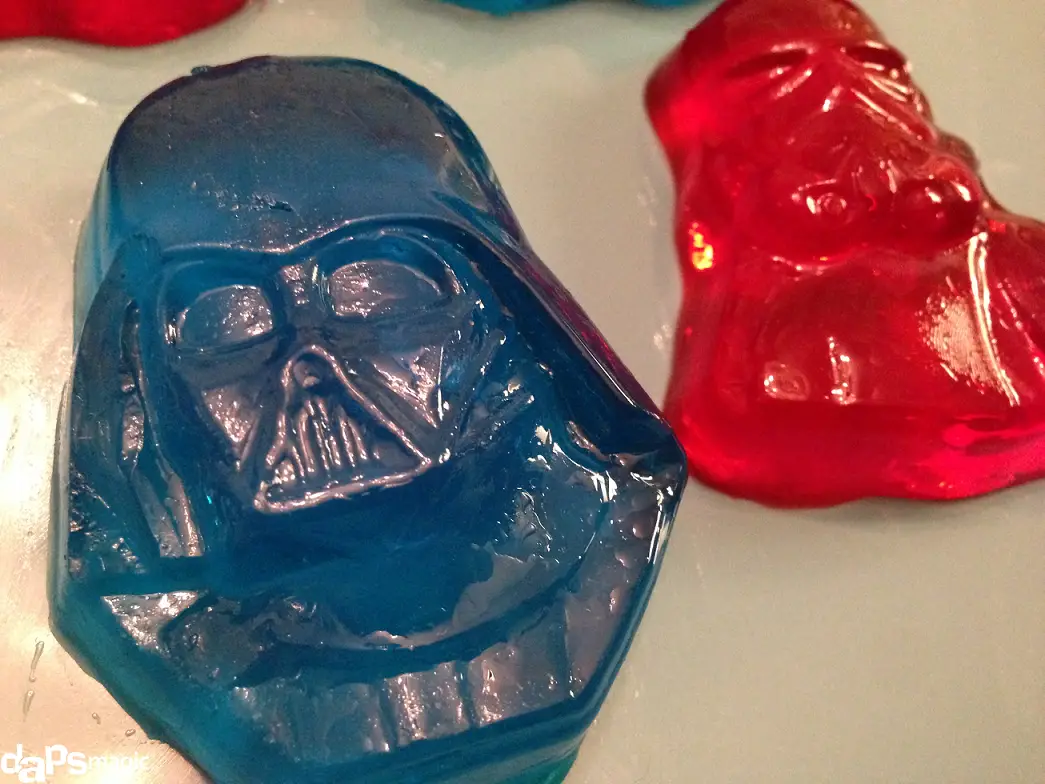
The box set included four packs of Jell-O in two flavors; Strawberry and Berry Blue. These boxes were smaller than the average sized box of Jell-O mix. Each box could fit six molds. All together, the entire kit could make up to 24 molds.


To get started, making the Jell-O properly is key or else the molds won’t hold. Quick side note, I purchased a regular sized Lime (green) flavored mix for the Yoda mold. Since it was a different size and had different directions for amount of water used, I assumed to use cold water after the mix discover with the hot water….do not do that! Since the recipe calls for use of hot water, do not add cold water like you would if you were to make regular Jell-O. If you add the cold water, the consistency of the Jell-O will not be as thick as it needs to be to hold the shape of the mold. Long story short, Yoda fell to pieces!
So to clarify, only use the boiling hot water directions and mix with the packet. The additional add in of cold water is not needed as it changes the thickness.
After you make your Jell-O by following the directions on the box (See photo), it is time to pour into the molds. In order to make sure the Jell-O does not stick, lightly spray the molds with cooking spray. The oil will prevent the Jell-O from adhering to the mold.
Once the mix is added to the molds, place in the refrigerator and your Star Wars Jell-O should be ready in about three to four hours. Also, it is best to not keep checking if they are done, i.e., poking them. This will leave indents in the Jell-O.
When ready, taking out the Jell-O from the mold is simple. All I did was use a toothpick to pull away the Jell-O from the edges and it slipped right out. Very simple and clean.
The hardest part in my opinion was eating these guys. They looked perfect and I felt bad eating strawberry flavored R2-D2.


Lastly, when cleaning the molds it works best to use warm to hot water to dissolve any tough stuck on Jell-O that might be on the tops of the tray. Also, I used a soap that lifted the oil residue from the cooking spray off as well. Nothing worse than a sticky mold for next time.
Hope you enjoyed this little project. I thought it was fun and I just had to share it with you. If you are interested in checking out other forms of Jell-O molds, they can be found by clicking here.
Leave a Reply